From cretaing the animation i have learnt how to use many different tools that i had not experienced before. Creating the mirror was very new to me as i had not worked with texture in that much detail previously. Using methods that i have used before but using different ways of manipulating them and editing them.
The line tool when used to move the camera i have not done before, it was good to learn this as it is a powerful way of moving around a scene, and moving objects in a scene on a track.
Overall i am very happy with the work that i created, although there is more i could have added to the romeo and juliet scene i was pushed for time and was not able to create anything new to the scene. This was my first attempt at creating an advertising animation and it want rather well.
Creating the indervidule objects went fine and they where simple to creat but when i was placing all the objects together into one file the computer began to struggle with the amount in it. and placing things would take a large amount of time and would sometime crash the file.
Creating textures, the amount of texture that where in the animation cause problems as i ran out of texture room in the editor. If a texture needed to be changed i have to export the object and edit it seperatly, then reimport.
But overall the animation went well, i feel that it works to the brief given and the decisions made by the group. The Transitions are set up as asked by the group and the animation is a cartoon as decided by the group.
With more practice with modeling and animation skills i have learnt i could use this many times in a proffession once uni is complete.
Friday, 10 December 2010
The Play
 The stage is setup fromt he transition ready for the play scene. Juliets head is animated to move as if she was speaking here lines. Romeo is hidden behingd the wall waiting to come out.
 Romeo comes out from behind the wall and looks up and juliet, the rotate tool was the main tool for this scene for when the characters are looking at each other.
 The move tool is used to make it seem that romeo is moving ovwer to the trelace leading up to juliet and the rotate is used to position him.
 The move tool is used to move romeo up the trelace and he is rotated to look at juliet. Juliet is moved over to romeo.
 The lights rotate towards the camera to end the play and to start the transition into the ending where it fades to white.
The romeo juliet scene where chosen as most people know the play and this scene is one of the most iconic scenes from the play. Also the play is being doing at the theater.
Transition
 The lights are animated to rotate once the band is gone and they are rotated to shine on the curtains ready to light up the play.
 The curtains open to the side, this was going to be done using the FDD box to make the open more like curtains, but i ran into issues with it not being able to animate correctly and time was running short. It was then dicided that the curtains would just move out to the sides to reveal the stage.
 The plane the magician walks accross was decided to be a mirror, using the material editor a mirror matterial was created, this was to show what was happening in the crowd and add the extra functionality to the scene.
 The components that where need for the play scenewhere added on to the stage, they where exported as objects and imported into the scene. The camera is positioned ready for the play scene.
The Music Scene - Lights

The are a greatnumber of lights in the scene the mainlights are the 4 spot lights that face the stage and the omni light that dims the room, the spot light highlight the main piont that are happening on the stage and are used as part of the transition between the music and the play.
The omni light is set to a low multiplyer, this is top di the room, so the lights on the stage become the main focus of the anuimation.
There are omni lights scatter up each of the aisles, this is to create the lights that shine to show the walk way.
The Music Scene - Camera
 The camera was set up infront of the bass drum of the drum kit as the transition from the casino and the music event is to do with the ace of spades.
 The line tool was used to creat a track for the camera to folow and a track for the camera target to follow. setting up the target to move later proved to be slightly difficult but one i had learnt how to use the tool, the process became simple.
The line is set up to show a fly over of the crowd as the band is playing in the scene.
The Music Scene - Crowd
 Using the characters created by johnny the seats of the theater where filled, not all the seats where filld, the last 2 rows stayed emty, this was due to the file becoming very big and the amount of objects in the file causing issues.
The crowd was then animated to jump up and down in the seats,this was while the music event is playing. To make the flow of the jumps more realistic most of the characters jump at different times than each other.
The Music Scene - Band
 The drums where then exported as an object file and then imported into the stage scene. The model was very large and was scaled down to fit on the stage better.
 The speakers where then exported as object files and imported into the music scene. Symmetry modifer was then added to the speakers to put them on either side of the drum kit.
 The character that Johnny had created where then imported into the scene and place at there positions in the scene, the drum kit needed to be resized to fit the drummer behind it.
 The microphone stand was then created and placed infront of the singer, this was made with a cylinder, and using the scale on the base to create new polygons.
 The guitars where then imported and placed hand height on the guitarests, these had to be resized to be the correct size.
Animation is added to the band member where thereheads move and the guitarests jump up and down, this was done to make them look less startic and give them life. The guitars where animated to move up and down this was to make it look like the character where playing there instruments.
The Music Scene - Chairs
 The chair models where exported as an object file and imported into the stage scene. The chairs where copied many times and placed into rows infront of the stage and to the sides of the stage. The chairs at the sides had to be addjusted slightly, by scaling the x axis to make it fit the side.
The stage was slightly taller than the chairs, so the height of the stage was adjusted to match the correct height.
The Play - Fountain

The fountain was made to add some more decoration to the scene, the fountain was made using a cylinder which has been maniputalted in editable poly using the inset tools and ectrude tools. The stone texture was applied and UVW Map was applied with a face setting. Turbosmooth was added to the fountain the make it look round and smooth. A blue plane was added to the fountain for the water.
Thursday, 9 December 2010
The Play - Balcony
 The balcony was created by creating a cylinder for the lower part of the balcony and cutting the cylinder in half. The edges for the top with then copied up and around to give the balcony some shape. This was done up and over the balcony shaping the rim of the balcony and the sides into a pattern. The sides where copied out to make the wall and connected to the balcony rim.
 The Archway was created and the stone texture was applied to the balcony, using the UVW Map cylinder mode and capping the top. The balcony was the turbosmoothed.
 The trellis was he created to go up the side of the wall, this was created by creating a box and rotating it on its side, then the box was copied and rotated again to form an X shape. This was the copied a number if times up the wall to create the trellis, a wood texture was applied to the trellis.
The Band - Speaker
 the speaker was made by creating a boz and extruding out the top and side. Then front faces of the speaker where inset and extruded out again, matirial ids where set to the speaker and a multi sub object was added to the speaker,
The Band - Lead Guitar
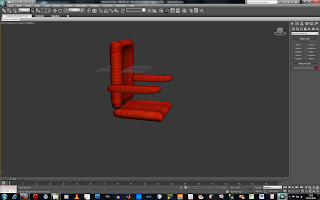
 in the same way as the bass was made the guitar started with the a box and was shaped into the shape of the body. the neck was extruded out and the head was shaped. The neck was curved and the body was curved on the edges.
 The sting holders on the head of the guitar where made by inserting the head where it was needing and extruding out. The texture was applied to the guitar as well as a turbosmooth.
 The strings where added by creating cylinders on there sides and making these longer, these where positioned onto the guitar and textured.
The Band - Bass Guitar

 The polygons on the body where manipulated to create the detail on the body, the pick-ups and bridge where extruded out of the bod and the polys where set up ready for the texture. The polygon ids where set up.
 A multi sub object was added to the model with the wood texture, metal texture and the red texture, The stings where added by creating cylinders on there sides and manipulating there size to be stings.
Tuesday, 7 December 2010
The Band - Drums
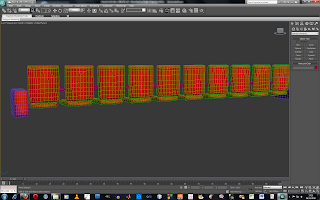
 When making the band for the music scene i started with making the drum kit. The drums was mainly made up of cylinders. i started with the bass drum which was a cylinder turned onto its side, work was done on the face of the drum so it was made up of quads this was so when it was turbosmoothed it did not loose its shape.
After the drum was made i extruded the stands for the toms up out of the bass drum. The toms themselves where made of cylinders and attached to the bass drum stands. the same was done to the faces of these drums are the bass drum.
The snare drum was made in the same way, but was made with a stand to go under the drum.
 The floor tom was made in the same was as the other toms, but with 4 legs extruded from the outside of the drum. Texture was added to the bass drum, toms and snare to make the drums look the part.
 To finish the drum kit off i careated the crash and high-hat, the cymbols where made with a cylinder with the sides and bottom removed, the the middle was moved up to spape the plane. the stand was made with a box that was scaled up wuth legs extruded out the bottom. The textures where added to the cybol and metal to give the finishing touch.
Textures used:

metal texture taken from: http://www.psdgraphics.com/tutorials/metal-texture-photoshop-tutorial/

rep patteren used on the drum taken from: http://slw381992.deviantart.com/art/Black-and-Red-Texture-60841004
Monday, 6 December 2010
The Hall - Chair
The seats to fill the room where very simple to create, from images of the cliffs pavilion on google i was able to find the general shape of the chair. I created 3 boxs which i shapped in the back of the chair, arm of the chair and seat of the chair. The seatch was then turba smoothed and the seat texture was applies to the seat.
 Once the one seat was created i copied this 9 more times to create the entire row of seats and then added the red box either side of the row of chairs, this box is the same tetture as the seats and was also turbo smoothed.
 The metal bars that hold the seat up and together where then added into the model, 3 bars where made, one for under the seats and 2 for the back. extrudes where made from the top bar leading under the arm rests of the seatch. The whole bar was then turbo smoothed.
The Hall - walls
 To creat the floor and walls i started with creating a plane behind the stage and following the shape round. I used images from google of the cliffs pavilion to get the chape of the walls as they come out from the sides and the roof as it drops to the stage.
The edges on the floor where lined up to create the seat sets, the texture was applied using a multi-sub object texture.
The Stage - Steps

The steps where fairly simple to create. Starting with a box in the front view the verticle and horizontal lines where added to the box. The box was then converted to an editable poly and polys where removed to create the steps shape. The polygons on top where then created.
Using the inset tool and the extrude tool the metal bars where created and the wooden banister.
The symetry modifier was added to the half of the steps to make the full steps.
Textures where then applied to the steps along with a UVW Map modifier and a second symetry modifier to put the steps on the other side of the stage.
The textures used for this object:
 The same black wooden floor texture as the stage
 Wood texture used for the banister taken from: http://www.wallpaperandborders.co.uk/wallpaper-shop/index.php?main_page=index&cPath=186
 Metal texture used for the bars taken from: http://www.vtb-inox.sitew.com/#Accueil.A
Sunday, 5 December 2010
The stage - Main Curtain

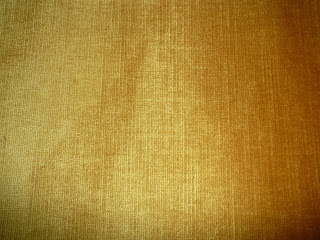
The are where the gold stripe would be added was formed by moving the edges on the plane to match where the gold would be.
Matirial ID's where assigned to the different sections using the polygon tool, and using multi-sub object the 2 textures where added.
The curtain was then turbo smoothed and UVW
Mapped to make the curtain look more realistic.
Textures used for this object:
Red:

Gold:
The stage - Under Curtain

Turbo smooth was added to the mesh to make the curtain look wavier.
The texture was applied to the object and the UVW Map modifier is used to fit the texture correctly.
The texture used:

Subscribe to:
Comments (Atom)